The SkinDesigner offers you the possibility to create your very personal DesignSkin®.This instruction shows all the opportunities given to you and how to efficiently use the different functions.
Contents
- Choosing your device
- Design Tools Overview
- Using your own Pictures and Graphics
- Choosing an image from the gallery
- Choosing graphics from the shape gallery
- Choosing a background color
- Adding your own text
- Button "choose/change device"
- Design Tools
- Button "Undo"
- Preview
- Product info
- Adding skin to the cart
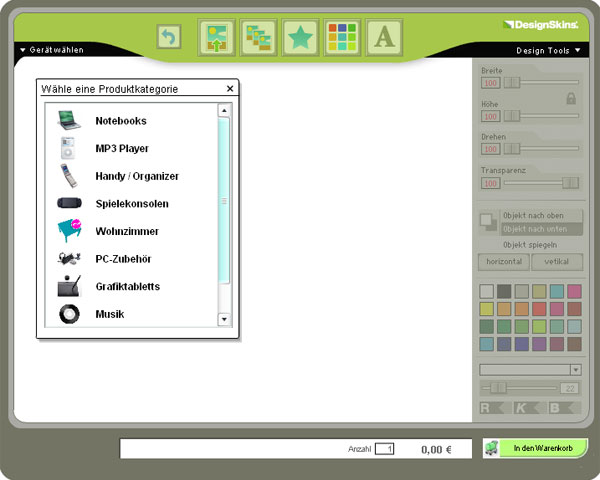
1. Choose your device
Before you start creating your DesignSkin you need to select a device. The window "choose your device" pops up automatically when starting the SkinDesigner.
|
2. Design Tools Overview
The SkinDesigner offers lots of functions which allow you to create a DesignSkin according to your wishes.

|
-
upload an own image file

-
choose an image from the gallery

-
choose a graphic from the shape gallery

-
choose a background color

-
add your own text

-
choose/change device

-
Design Tools

-
undo

-
Preview

-
Product info

-
add skin to cart

|
3. Upload an own image file

You would like to use your own images and graphics to create your DesignSkin? Thats a breeze! This step-by-step tutorial will show you how to do it and what to consider:
Upload an image file Step-by-Step
-
Click the button "upload your own image".
-
Click the "browse" button, select a picture and click "open".

-
Click the "upload image" button.
-
Now there will appear a window containing our copyright details. Please, read them attentively and only accept them if you agree with the terms. If you are uncertain, please read the information on the page "What should I consider to prevent infringement if I use my own motif?".

-
If you agree with our copyright details checkmark I have read and accept the above terms. After clicking Ok your picture will be uploaded into the SkinDesigner. You will not be able to upload files if you do not accept the copyright terms.
-
When the upload is done your picture will appear in the SkinDesigner. By using the design tools your picture can be resized, rotated, replaced and much more. See also Design Tools
Uploading an image what to consider
-
1.File type
You can upload the following formats into the SkinDesigner: JPG, GIF or PNG. Any other file types are not supported. If you need to you can convert your image into one of the supported formats with an image editor on your computer (e.g. Photoshop, ACDSee etc.) or with one of the free online services (e.g. media-convert.com or zamzar.com).
-
Image size:
-Resolution: 150dpi 300 dpi
-max. file size: 5MB
|
4. Choose an image from the gallery
Click the button image from gallery, select one of the given categories and click on the image of your choice. Now your picture will appear in the SkinDesigner. By using the design tools your picture can be resized, rotated, replaced and much more. See also Design-Tools.
|
5. Choose a graphic from the shape gallery
Click the button graphic from gallery, select one of the given categories and click on the graphic of your choice. Now your picture will appear in the SkinDesigner. By using the design tools your picture can be resized, rotated, replaced and much more. See also Design Tools.
|
6. Choose a background color
Click the button DesignSkin colorand choose a color from the color fields down right.
|
7. Add your own text
Click the button add own text. Now it will appear in the SkinDesigner. By using the design tools your picture can be resized, rotated, replaced and much more. See also Design Tools.
|
8. Button "choose/change device"
Before starting to create your DesignSkin you need to choose the device the skin is intented for. You can also use this button to change devices. You have the chance to transfer or to discard the existing graphics.
|
9. Design Tools
The Design Tools are located on the right and enable chosen objects to be rotated, resized, replaced and to alter their color. a) sliding controller width/height: Resizes the chosen object. Click the lock to configure width and height to be scaled proportionally or independently from one another. b) sliding controller rotate: Rotates the chosen object. c) sliding controller transparency: Changes the opacity of the chosen object. It becomes more clearly if you increase the magnitude. d) button horizontal/vertikal: Mirrors the chosen effect horizontal or vertical. e) color palette: By clicking on one of the given colors you can change the color of your graphic or text. f) font tools: You can not only choose a font but use the slide controller to change the font size and you can also use the three buttons R,K,B (R=regular, K=italic, B=bold) to change the format of the text.
|
10. Button "undo"
This button makes it possible to easily undo a command.
|
11. Preview
Click the "preview" button to have a look at your final DesignSkin. The "back" button leads you back to the SkinDesigner.
|
12. Product info
The column for product information displays the chosen device, the amount of DesignSkins and the price.
|
13. Add skin to cart
This button forwards you to the order process.
|